![[Typescript] Jest でユニットテスト環境を作る方法](https://webbibouroku.com/wp-content/uploads/eye_typescript.png)
Tyepscript のテスト環境(jest)構築
Javascript のテスト用ツールはいろいろありますが、Facebook製の jest というテスト用フレームワークを使う方法をまとめます。
今回は Typescript で書かれたコードのテスト実装します。
jest とは
Jest is a delightful JavaScript Testing Framework with a focus on simplicity.
It works with projects using: Babel, TypeScript, Node, React, Angular, Vue and more!
シンプルで Node とか React とか Typescript とかいろんな環境に対応したテストフレームワークです。
サンプル
一応上のページを参考にしつつ進めます。
最初に適当なディレクトリでプロジェクトを作ります。
$ npm init -y
インストール
必要なツールをインストールします。
$ npm install --save-dev typescript jest @types/jest ts-jest
とりあえず Typescript と jest を入れておきます。
package.json, tsconfig.json
それぞれ以下の通り変更&作成します。
package.json
{
  // ...
  "scripts": {
    "test": "jest"
  },
  "jest": {
    "moduleFileExtensions": [
      "ts",
      "tsx",
      "js"
    ],
    "transform": {
      "^.+\\.(ts|tsx)$": "ts-jest"
    },
    "globals": {
      "ts-jest": {
        "tsConfigFile": "tsconfig.json"
      }
    },
    "testMatch": [
      "**/__tests__/*.spec.+(ts|tsx|js)"
    ]
  },
  // ...
}
npm test で jest のテストを起動するようにコマンドを設定し、jestの設定値を追加しています。
tsconfig.json
{
  "compilerOptions": {
    "target": "es5",
    "module": "commonjs",
    "outDir": "./dist",
    "strict": true,
    "esModuleInterop": true,
    "sourceMap": true
  },
  "include": [
    "./src/**/*.ts"
  ]
}
tsconfig.json は Typescript のコードをコンパイルする際の設定値です。
今回は “src” 以下にコード、”__tests__” 以下にテストコードを配置します。
コード
まず以下のようなテスト対象のコードを作成します。ただの足し算を行う関数です。
./src/sum.ts
export function sum(x: number, y: number): number {
  return x + y;
}
次にテストコードを作成します。
./__tests__/sum.spec.ts
import { sum } from '../src/sum';

test('adds 1 + 2 to equal 3', () => {
  expect(sum(1, 2)).toBe(3);
});

// describe-it の書き方でもよい
describe('sum() のテスト', () => {
  it('sum(1, 2) == 3', () => {
    expect(sum(1, 2)).toBe(3);
  });
});
テストの記述方法については test と describe-it の2通りがあります。
test ... の書き方が jest 特有の書き方みたいです。describe-it の書き方の方が個人的にはやりやすいので両方使えるのは便利です。
test は it の別名みたいな扱いのようです。テスト項目とテスト用のコールバックを渡すという使い方は同じです。
テスト実行
ではテストを実行します。
$ npm test

...

 PASS  __tests__/sum.spec.ts
  √ adds 1 + 2 to equal 3 (3ms)
  sum() のテスト
    √ sum(1, 2) == 3 (1ms)

Test Suites: 1 passed, 1 total
Tests:       2 passed, 2 total
Snapshots:   0 total
Time:        2.752s
Ran all test suites.
テストが実行されてその結果が出力されます。
テストを Watch する
package.json
{
  // ...
  "scripts": {
    "test": "jest --watch"
  },
  // ...
}
jest コマンドに watch パラメータをつけることでファイルの変更を監視し、変更があるたびにテストを実行することが可能になります。この watch は Git の最終コミットとの差分を用いて変更があったかを判定します。変更対象の内容のみ再テストが行われます。
したがって差分がなければテストは実行されず、以下のように表示されます。
No tests found related to files changed since last commit.
Press `a` to run all tests, or run Jest with `--watchAll`.

Watch Usage
 › Press a to run all tests.
 › Press f to quit "only failed tests" mode.
 › Press p to filter by a filename regex pattern.
 › Press t to filter by a test name regex pattern.
 › Press q to quit watch mode.
 › Press Enter to trigger a test run.
上に書かれている通り、--watchAll パラメータをつければすべて監視してテストを再度自動的に実行できます。
テスト実行中のコマンドラインで指定のボタンを押すことで全てのテストを再実行したり、失敗したテストだけを再実行したり、いろいろできます。
詳細は上のページを参考にしてください。
カバレッジを出力する
カバレッジの出力もパラメータを追加するだけでできます。
package.json
{
  // ...
  "scripts": {
    "test": "jest --watch --coverage"
  },
  // ...
}
実行すると以下のような表形式でカバレッジが出力されます。
 PASS  __tests__/sum.spec.ts
  √ adds 1 + 2 to equal 3 (4ms)
  sum() のテスト
    √ sum(1, 2) == 3 (1ms)

----------|----------|----------|----------|----------|-------------------|
File      |  % Stmts | % Branch |  % Funcs |  % Lines | Uncovered Line #s |
----------|----------|----------|----------|----------|-------------------|
All files |      100 |      100 |      100 |      100 |                   |
 sum.ts   |      100 |      100 |      100 |      100 |                   |
----------|----------|----------|----------|----------|-------------------|
Test Suites: 1 passed, 1 total
Tests:       2 passed, 2 total
Snapshots:   0 total
Time:        2.586s
Ran all test suites related to changed files.
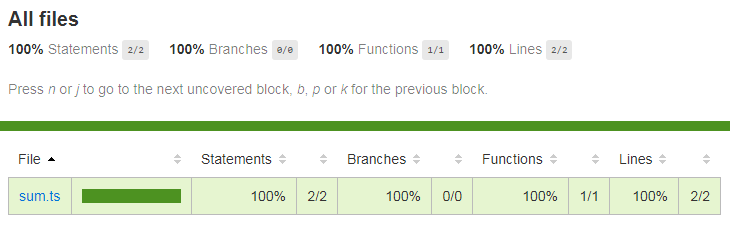
同時に、./coverage 以下にカバレッジ結果のファイル群が生成されます。./coverage/lcov-report/index.html を確認すると、ブラウザでいい感じの出力形式で表示できます。
とりあえず以上です。